Monday, December 6, 2010

Adelaide

I promised some sewing posts, and here I am to deliver. This dress has been a long time in the making.

Adelelaide dress

Guess how much she cost me?

$4.00 for fabric on the last day of the 4-H fabric sale
$1.00 pattern (Jo-Ann's sale)
$2.00 for interfacing
$3.00 for thread

Comes down to a total of $10 for a tailored dress. Not bad. :-)

I've wanted a red dress for the longest time, and now I have one.

Before I go, I just wanted to share a close up of the pleated sleeve. I love these kinds of sleeves. McCall's did a nice job with this pattern.

Adelaide sleeve

Next up, my pleated purse with a customized liner.

Sunday, October 31, 2010

Harvest Tortellini Soup

October is a wonderful month. The leaves look gorgeous, and the weather is nice and crisp. And my allergies attack my poor little sinuses until they give in to a full fledged sinus infection. I try every year to fight it off, but the infection comes with out fail. Its a good time to enjoy soup. And boy have been enjoying soup in this house! We have about four different kinds in the freezer at the moment.

Garden Tortellini Soup

This recipe is one that I just whipped up at the beginning of the month to use up what was left of my tomatoes. In late September, I pulled all the green tomatoes and put them in a big, brown paper bag in a cool dark spot. I wasn't sure it would work, but they actually ripened. And not so quickly that they rotted, either!

Then, when they were ready. I peeled and sliced them. If you haven't done this before, it is surprisingly simple! It was my first time trying this, and I was pleased. Bring a large pot of water to boil, with a dash of salt. Then, dunk the tomatoes in for 30 seconds and place them in a large bowl. Do not put them in cold water or on ice. Just let them cool. The skin peels off so easily!

Ok, now, to the recipe. As usual, I made this "dutch" so you could alternate it as you like.

I used:

About 10-12 medium sized tomatoes, peeled and cut into medium pieces
Large handful green beans (frozen or fresh)
Large handful sliced carrots (frozen or fresh)
1 whole zucchini, sliced
2 cans Veggie broth
Half cup of chopped onion
About 6 oz. of cheese tortellini*
Olive Oil
Shake or two of preferred Italian spices, to taste**

*I actually used a little more than half of a 12 oz. package. If I don't stuff the soup with tortellini, Ben will put all the tortellini in his bowl, and I will get about three. :-)

**My spice rack actually came with a jar of Italian spices that contains basil, thyme, oregano and marjoram.

First, I cooked the veggies in the bottom of a large pot with olive oil and spices. I added the tomato last...about right when the rest of the veggies were ready.

Then, I added the broth and brought it to a boil. Once it was boiling, I simmered it for about 20-30 minutes until heated throughout. You can add a teaspoon or two of tomato paste here, to thicken it if you like.

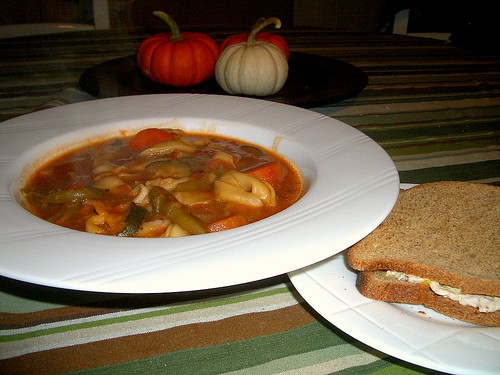
That's all folks! Goes great with tuna sandwiches. :-)

Monday, September 13, 2010

Summer projects

Most of the summer I spent holed up in my bedroom (the only room with sufficient A/C). Even there, it was too hot to work on my biggest project most of the time. I was working on this wonderful knot-pattern scarf for my father-in-law's birthday in August. Sure, August seems like a strange time to give someone a thick, wool scarf. But it was my husband's idea (and he was so very excited about it), and well, he won't be receiving the scarf at Christmas after the ridiculous Lake Effect snow has already begun. My FIL was very pleased with the gift and said he looks forward to using it the next time his snow blower breaks in the middle of a blizzard. Hehe.

I called it the Mariner's knot scarf because he really likes to take his boat out on the lake with the entire family.


Mariner's Knot Scarf

Here's a close up of the knot-pattern:

Mariner's Knot Scarf

The knot was a little difficult to work with at first. If you use this pattern make sure to make all of your knit rows loose! Otherwise you won't be able to get the needle through three stitches three times in the next row. Once I figured that out it was a breeze to knit.

Also, for the cast-on method I found this video very helpful:


She goes nice and slow so you can actually see what she's doing. :)I like this method for casting on bigger projects. Once I learned it, it went by so very fast! Though I did not do the correlating bind-off, and you really couldn't tell.

My other project, when it was way too hot to knit with wool was this neat little tea wreath:
Tea Wreath
(Please excuse the glare... the lighting in our home is a bear to work with).
I had been trying to come up with a better way to offer the variety of tea I have to guests. Flinging open the cabinet always kind of intimidated them, and all the tea was high above the stove. Kojodesigns solution works out perfectly. I put the rest of the tea bags in little baggies in a drawer. No more boxes filling up my cabinet! Which is nice, since our kitchen is very organizationally space challenged.

Ok, I've rambled on enough. I am working on some Christmas projects that I'll have to wait to share. But I also just got a dress-form, so look forward to some sewing projects coming up!

Thursday, August 26, 2010

"New" Shoes

I was packing for a wedding last week when I realized the outfit I was going to wear (pink knit top with white and pink floral skirt) had only one pair of shoes that would go with it, and those shoes were kind of nasty looking.

shoes before

So, I decided on a whim to see if I had any fabric paint that would work. Lo and behold I just happened to have a pearly white and pink. I also had on hand a jar of buttons, which included some cute little green ones. I really wasn't sure about painting faux leather with fabric paint, but I figured I couldn't end up with worse than I had.

Here is the end result:


I was pretty pleased with them, and I got several inquiries as to "Where did you get your shoes?"

Friday, June 25, 2010

New design

I redesigned the blog. Wonderful background image courtesy of Ollibird.

Wednesday, June 23, 2010

Family Tree Pendant


I fell in love as soon as a I saw ~Ruffles And Stuff~ family tree brooch/pendant. So much so that I dove head first into wire jewelry making.

I made this for Ben's sister Suzie and I'm so glad that she loves it.


It was a fun, meaningful gift to make, and I don't feel so shy about jewelry making any more.

Monday, May 17, 2010

S'More Brownies, Please!

Last summer, after a brief camping trip we had half a bag of marshmallows, two Hershey's bars and two sleeves of graham crackers and no fire to make s'mores with. I also had on hand a box of Betty Crocker Family Size Fudgey Brownie mix.

So I created this:


We'll be camping with friends again around July 4th, so I'm sure I'll do it again. Then, maybe I'll have pictures to add to the tute. But here's the breakdown:

Graham Cracker Crust
1) Crush graham crackers. About one sleeve did it.
2) Melt butter- 6 to 8 tbsp depending on your preference.
3) Combine and line bottom of your cake pan.

Brownies
1) Break up 1 Hershey bar into small pieces.
2) Mix brownies as directed, adding pieces of chocolate bar.
3) Pour over graham cracker crust.
4) Bake in oven as directed

Marshmallows
Now, my stove has a broiler underneath that works really well for this. I simply lined the top of the brownies with marshmallows, turned the broiler on and put them in just long enough to brown the marshmallows (it's really not long!).

Otherwise, you could probably remove the brownies a few minutes before they are done, place the marshmallows and put them back in the oven.

Enjoy!

Monday, April 12, 2010

Sticks & Stones Scarf and the Dread Pirate Gloves


My husband likes different. And I can't blame him. I wouldn't want a plain old boring black pair of gloves and scarf either. And that's mostly what is out there for men. But this past winter was freezing, and even winters before I couldn't bear seeing him go out without a scarf and gloves. So we picked out this fun (yet subtle) Sticks and Stones yarn by Caron Simply Soft Paints.

I started with the scarf, the basic Ribbed scarf pattern from Deb Stoller's book. I opted to use size 13 US needles instead to give it a kind of lacy openwork kind of feel and made it plenty long for him to wrap around several times.

Sticks and stones scarf


Then he asked me to make gloves. His scarf was only my second project, so I said, wait and we'll see. Everyone I had ever talked to said to stick to mittens or fingerless gloves. Gloves sounded horrible! Well, here's a little thing about me. I don't tend to stick to what people recommend and I always like a challenge. So after knitting the booties (see previous post), I was ready to try something new. I decided to try the Ken pattern by Berroco.

Finished Dread Pirates Gloves


Since the project turned out to be a surprising success despite all the warnings I heeded not, I named them the Dread Pirate Gloves.

I did have a few snags. The first few rounds on DPNs is a bear. There was no mention of how to add yarn when you move on to the next finger. I finally found a how-to somewhere online, but it didn't warn about it creating holes between the fingers. I found that if you thread the yarn through back and forth with a needle a few times before knitting there really wouldn’t be much of a gap. Don’t know if that’s the best way to do it, but they look good! And I learned it is much better to use the person's actual hand (if available) instead of the measurements in the pattern. The second glove is little wonky (one of his favorite words) because I failed to do this.

All in all, I enjoyed taking on the challenge of "the dreaded gloves," and Ben is pleased with his new gloves (and has been wearing his scarf all winter). I look forward to scaling more knitting mountains. :-)

Oh, a funny little bit! I finished all of this with two skeins. I really thought I wasn't going to have enough for the second glove so I went all over to find another skein. My Jo-Ann's was out of it, and I ended up driving 45 minutes to get a third skein. I never needed it. In fact, I had this much of the second skein left:

Left over!


So, for next winter, I think a matching hat?

Friday, March 12, 2010

Snuffleupagus Booties

My Gran has this thing about gifts. We aren't allowed to buy them, only handmade will be accepted. She gets pretty cold, so I thought for this last Christmas I'd make her a nice pair of comfy booties. I had just started to learn to knit so I wanted something pretty simple. I came across this pattern on AOK Corral and thought I'd give it a try.

Easy they indeed were and they are definitely warm, but they are rather unshapely. That along with the texture of the yarn reminded me of Mr. Snuffleupagus from Sesame Street. I don't know. What do you think?

Snuffleupagus booties


These aren't actually the ones I made for her. I made these for my mother-in-law for her birthday. The first one's were really unshapely, so I used less stitches so that they wouldn't be so wide. But I'm still not thrilled with the end result.

Update: she loved them and kept remarking how adorable they were. :-)

Monday, February 22, 2010

Hullo

Hullo, blogosphere. While I'm not a new blogger, I am new to craft blogging. If nothing else, this will be a nice space to chronicle my attempts at making a nice home for my husband and I. My hope, however is to share tips and patterns, etc. along the way with any who might be interested.

So thank you for stopping by and hope that you will be coming again soon to see what I have been whipping up.

~Lidi Di